Descrizione
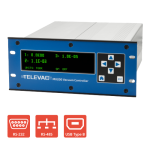
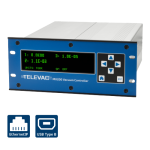
Questa nota applicativa illustra il processo di interfacciamento e comunicazione con un MX200 da un PC Windows. Prima di seguire queste istruzioni, è necessario installare il programma di comunicazione seriale Tera Term. Se non si dispone di Tera Term, fare clic qui per installare l'ultima versione da GitHub.
Istruzioni
1. Collegare la porta USB di MX200 sul retro dell'unità a una porta USB del PC.
2. I driver dovrebbero essere scaricati e installati automaticamente. In caso contrario, i driver possono essere scaricati qui.
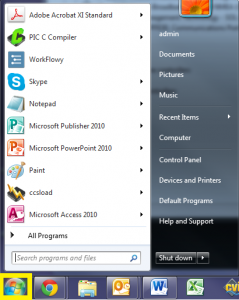
3. Aprire il menu Start.
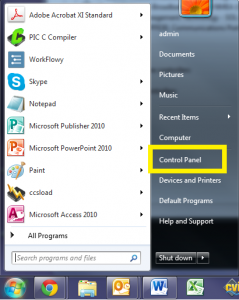
4. Aprire il Pannello di controllo.
5. Aprite Hardware e suoni.
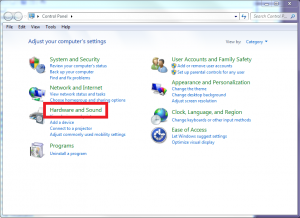
6. Aprire la Gestione periferiche.
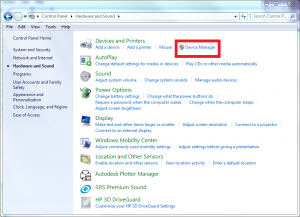
7. Espandere il menu a tendina Porte (COM e LPT).
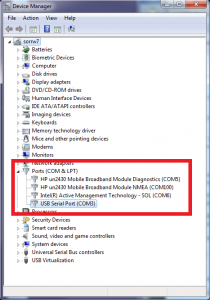
8. Determinare l'assegnazione della porta COM per l'MX200; in questo esempio l'MX200 è assegnato alla COM3.
9. Aprire TeraTerm.
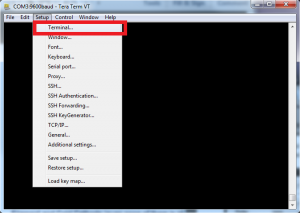
10. Aprire il menu Impostazione e selezionare l'opzione Porta seriale....
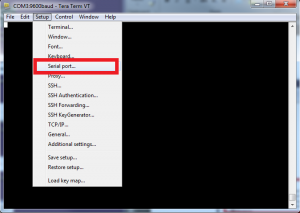
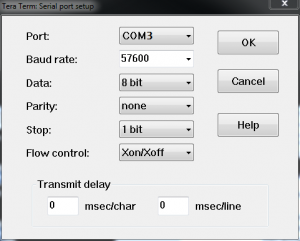
11. Cambiare l'impostazione Porta con la porta COM di MX200, in questo esempio è COM3.
12. Assicurarsi che le altre impostazioni corrispondano a quelle mostrate di seguito, quindi selezionare OK. Si noti che in questo esempio si utilizza la velocità di trasmissione predefinita di 57600. Questa può essere modificata dal pannello frontale premendo il tasto Home e andando su Impostazione globale>Comunicazioni>Impostazioni>Tasso di baud.
- Velocità di trasmissione: 57600
- Dati: 8 bit
- Parità: nessuna
- Stop: 1 bit
- Controllo del flusso: Xon/Xoff
- Ritardo di trasmissione: 0 msec/char, 0 msec/linea
13. Aprire il menu Impostazione e selezionare l'opzione Impostazione terminale....
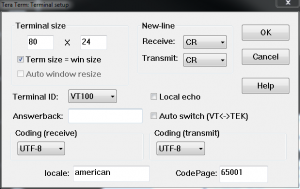
14. Assicurarsi che le impostazioni siano le seguenti in base all'uso che si farà delle comunicazioni, quindi selezionare OK:
Per il bootloading
- Ricevere: CR
- Trasmettere: CR
- Eco locale: non controllato
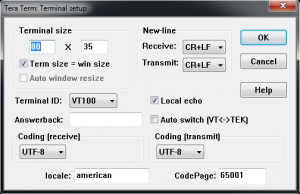
Per comunicazioni standard nel terminale
-
- Ricevere: CR+LF
- Trasmettere: CR+LF
- Eco locale: controllato
15. You should now be able to communicate with the MX200. As an example, send the following command to read the output from all connected channels: “S1<cr>” (not including the quotations). A list of all commands can be found below in Table 1. A more detailed description of the communications can be found in the MX200 manual.
| Comando | Uscita del campione | Descrizione |
| R1<cr> | XX<cr><lf> | Impostazione unità di uscita XX: PA=Pascal, TR=Torr, MB=mBar, TD=Torr decimale, MT=mTorr/Torr |
| W1XX<cr> | XX<cr><lf> | Impostare le unità di misura su XX: PA=Pascal, TR=Torr, MB=mBar, TD=Torr decimale |
| S1XX<cr> | ppsee<cr><lf> | La lettura a vuoto per la stazione XX è ppsee |
| S1<cr> | XX=ppsee … XX=ppsee<cr><lf> | Uscita ppvedere le letture per ogni canale XX |
| S2<cr> | NNNNNN<cr><lf> | Versione del firmware logico |
| S3<cr> | NNNNNN<cr><lf> | Visualizzare la versione del firmware |
| S4<cr> | XX=YY … XX=YY<cr><lf> | Tipi di stazioni di uscita: XX = numero di stazione, YY = tipo di sensore |
| S5<cr> | XX=YY … XX=YY<cr><lf> | Uscita set point XX stato YY (ON=on, OF=off, 00=nessun set point collegato) |
| S6<cr> | Televac … <cr><lf> | Visualizza tutte le informazioni di configurazione |
| RC1XX<cr> | Baa<cr><lf> | Uscita primo punto di taratura per il canale XX |
| RC2XX<cr> | Baa<cr><lf> | Secondo punto di taratura dell'uscita per il canale XX |
| RC3XX<cr> | Baa<cr><lf> | Uscita terzo punto di calibrazione per il canale XX, errore di ritorno se il punto non esiste |
| RC4XX<cr> | Baa<cr><lf> | Uscita quarto punto di calibrazione per il canale XX, errore di ritorno se il punto non esiste |
| WC1XXBaa<cr> | PPSEE<cr><lf> | Impostare il primo punto di taratura per il canale XX |
| WC2XXBaa<cr> | PPSEE<cr><lf> | Impostare il secondo punto di taratura per il canale XX |
| WC3XXBaa<cr> | PPSEE<cr><lf> | Impostare il terzo punto di taratura per il canale XX, errore di ritorno se il punto non esiste |
| WC4XXBaa<cr> | PPSEE<cr><lf> | Impostare il quarto punto di taratura per il canale XX, errore di ritorno se il punto non esiste |
| R2<cr> | 01 02 03 04 05 … <cr><lf> | Numeri dei canali di uscita collegati all'MX200 |
| R3XX<cr> | HI<cr> or LO<cr><lf> | Uscite con risoluzione HI/LO per la stazione XX |
| W3XX<cr> | HI<cr> or LO<cr><lf> | Attivare la risoluzione HI/LO per la stazione XX |
| R4<cr> | 01 02 03 04 05 … <cr><lf> | Numeri dei canali di uscita impostati per la visualizzazione sullo schermo di misura |
| W4XX<cr> | ON<cr> or OF<cr><lf> | Aggiunge o rimuove il canale XX dalla schermata di misura |
| R5XX<cr> | FbaaBAA<cr><lf> | Formato di uscita analogica in uscita, valori alti e bassi |
| W5XXF<cr> | F<cr><lf> | Impostare il formato di uscita analogica del canale XX su lineare per decennio (lin/dec=3, lin/dec 7E=4) |
| W5XX1baa<cr> | Fbaa<cr><lf> | Impostare il formato di uscita analogica del canale XX su lineare: baa=alto valore |
| W5XX2baaBAA<cr> | FbaaBAA<cr><lf> | Impostare il formato di uscita analogica del canale XX su lineare: baa=valore alto, BAA=valore basso |
| R6XX<cr> | GG<cr><lf> | Impostazione gas in uscita per il canale XX |
| W6XXGG<cr> | GG<cr><lf> | Impostare il canale XX sul tipo di gas su GG |
| R7Y<cr> | ppseePPSEEZZ<cr><lf> | Relè di uscita Y on = ppsee, relè Y off = PPSEE, e canale ZZ assegnato al relè Y |
| W7YppseePPSEEZZ<cr> | ppseePPSEE<cr><lf> | Impostare il relè Y su ppsee, il relè Y su PPSEE e il relè Y sul canale ZZ |
| R8<cr> | A<cr><lf> | Emette il modo catodo freddo, A (auto = 1, auto = 2) |
| W8A<cr> | A<cr><lf> | Imposta il modo catodo freddo, A (auto = 1, auto = 2) |
| R9<cr> | BB<cr><lf> | Restituisce il valore del punto di commutazione del catodo freddo, BB (da 01 a 50) |
| W9BB<cr> | BB<cr><lf> | Imposta il valore del punto di commutazione del catodo freddo, BB (da 01 a 50) |
| R10<cr> | CD<cr><lf> | Restituisce lo stato di catodo freddo dispari e pari (on/off) C-odd, D-even (0 = off, 1 = on) |
| W10CD<cr> | CD<cr><lf> | Imposta lo stato del catodo freddo dispari e pari (on/off) C-odd, D-even (0 = off, 1 = on) |
| C1TTTT<cr> | TTTT<cr><lf> | Impostare il baud rate su TTTT |
| C2EE<cr> | EE<cr><lf> | Impostare l'indirizzo su EE (da 00 a 99), solo RS-485 |
| C4N<cr> | N<cr><lf> | Cambiare I/O in N (RS-232=1, RS-485=2, USB=3) |
| C1<cr> | TTTT<cr><lf> | Impostazione del baud rate di uscita |
| C2<cr> | EE<cr><lf> | Indirizzo di uscita per RS-485 |
| C4<cr> | N<cr><lf> | Tipo di comunicazione in uscita (RS-232=1, RS-485=2, USB=3) |
| HM<cr> | M<cr><lf> | Ritorno alla schermata di misura |
| RLR<cr> | SXXX<cr> | Uscita il calcolo del tasso di perdita o canale 1 in mTorr (S=segno, XXX=-999 a 999) |
| WLRX<cr> | X<cr><lf> | Attivare o disattivare il calcolo del tasso di perdita per il canale 1 (0=off, 1=on) |
| WD_1XX<cr> | XX<cr><lf> | Ripristinare le impostazioni predefinite del canale XX |
| WD_7X<cr> | X<cr><lf> | Ripristinare le impostazioni predefinite del relè del set point per il set point X |
| WD_CXX<cr> | XX<cr><lf> | Ripristinare i valori predefiniti di taratura per il canale XX |
| WD_G<cr> | D<cr><lf> | Ripristinare i valori predefiniti per la configurazione globale |
| SN<cr> | NNNNNN<cr><lf> | Restituisce il numero di serie a sei cifre dell'unità, con valori da 000000 a 999999 |
| PG_LGC<cr> | Bootloader … <cr><lf> | Inserisce il bootloader per il firmware logico |
| PG_DSP<cr> | Bootloader … <cr><lf> | Inserisce il bootloader per il firmware del display |
Prodotti correlati
- Da 1*10-11 Torr a 1*104 Torr
- Controllo di un massimo di 10 misuratori di vuoto Televac
- Comunicazioni digitali RS-232/RS-485/USB
- Display OLED di facile lettura
Controllore di vuoto MX200 EthernetIP
- Da 1*10-11 Torr a 1*104 Torr
- Controllo di un massimo di 10 misuratori di vuoto Televac
- Comunicazioni digitali EthernetIP/USB
- Display OLED di facile lettura


