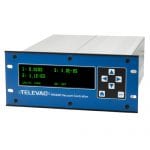
説明
This application note explains the process for interfacing and communicating with an MX200 from a Windows PC. The serial communications program Tera Term must be installed prior to following these instructions. If you don’t have Tera Term installed, click here to install the latest version from GitHub.
指示
1. Connect the MX200 USB port on the back of the unit to a USB port on your PC.
2. Drivers should automatically download and install. If not, the drivers can be downloaded here.
3. Open the Start Menu.
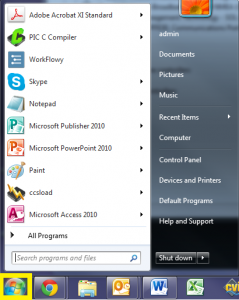
4. Open the Control Panel.
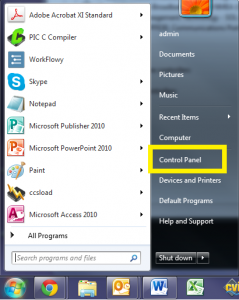
5. Open the Hardware and Sound.
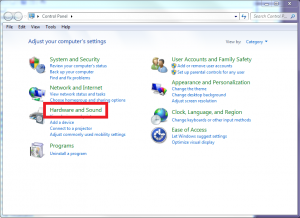
6. Open the Device Manager.
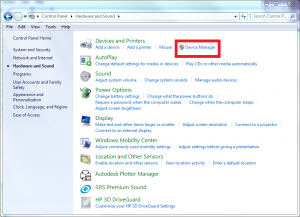
7. Expand the Ports (COM & LPT) drop down.
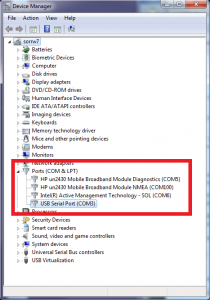
8. Determine the COM port assignment for your MX200, in this example the MX200 is assigned to COM3.
9. Open TeraTerm.
10. Open the Setup menu and select the Serial port… option.
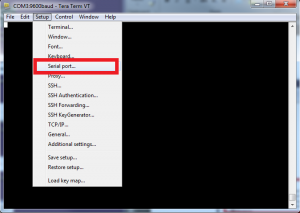
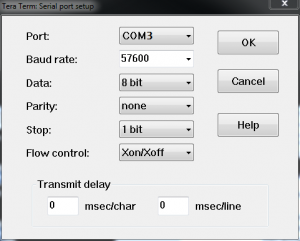
11. Change the Port setting to the COM port for your MX200, in this example it is COM3.
12. Ensure that the remainder of the settings match what is shown below, then select OK. Note that this example uses the default baud rate of 57600. This can be changed through the front panel by pressing the home button then going to Global Setup>Communications>Settings>Baud Rate.
- ボーレート。57600
- データ。8ビット
- パリティ:なし
- 停止:1ビット
- フローコントロール。Xon/Xoff
- 送信遅延。0msec/char、0msec/line
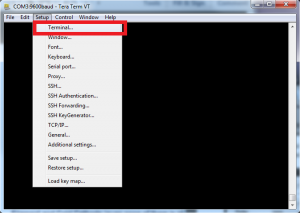
13. Open the Setup menu and select the Terminal setup… option.
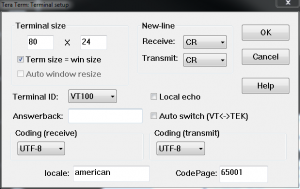
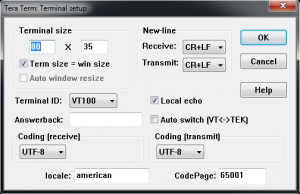
14. Ensure that the settings are the following based on how you’ll be using the communications, then select OK:
ブートロードの場合
- 受信します。CR
- 送信します。CR
- ローカルエコー: チェックなし
端末内の標準通信用
-
- 受け取ります。CR+LF
- 送信します。CR+LF
- ローカルエコー:チェック済み
15. You should now be able to communicate with the MX200. As an example, send the following command to read the output from all connected channels: “S1<cr>” (not including the quotations). A list of all commands can be found below in Table 1. A more detailed description of the communications can be found in the MX200 manual.
| コマンド | サンプル出力 | 説明 |
| R1<cr> | XX<cr><lf> | 出力単位設定XX:PA=パスカル、TR=Torr、MB=mBar、TD=Torr 10進数、MT=mTorr/Torr |
| W1XX<cr> | XX<cr><lf> | 単位をXXに設定:PA=Pascal、TR=Torr、MB=mBar、TD=Torr decimal |
| S1XX<cr> | ppsee<cr><lf> | ステーションXXの真空度測定値はppsee |
| S1<cr> | XX=ppsee … XX=ppsee<cr><lf> | 各チャンネル XX の出力 ppsee 読み取り値 |
| S2<cr> | NNNNNN<cr><lf> | ロジックファームウェアバージョン |
| S3<cr> | NNNNNN<cr><lf> | ファームウェアのバージョンを表示 |
| S4<cr> | XX=YY … XX=YY<cr><lf> | 出力ステーションの種類。XX = ステーション番号、YY = センサータイプ |
| S5<cr> | XX=YY … XX=YY<cr><lf> | 出力設定点 XX 状態 YY(ON=ON、OF=OFF、00=設定点接続なし) 出力設定点 XX 状態 YY(ON=ON、OF=OFF、00=設定点接続なし |
| S6<cr> | Televac … <cr><lf> | すべての設定情報を出力 |
| RC1XX<cr> | Baa<cr><lf> | チャンネル XX の最初の校正ポイントを出力します。 |
| RC2XX<cr> | Baa<cr><lf> | チャンネル XX の 2 番目の校正ポイントを出力します。 |
| RC3XX<cr> | Baa<cr><lf> | チャンネル XX の 3 番目のキャリブレーションポイントを出力し、ポイントが存在しない場合はエラーを返します。 |
| RC4XX<cr> | Baa<cr><lf> | チャンネルXXの4番目の校正ポイントを出力し、ポイントが存在しない場合はエラーを返す |
| WC1XXBaa<cr> | PPSEE<cr><lf> | チャンネル XX の最初の較正ポイントを設定します。 |
| WC2XXBaa<cr> | PPSEE<cr><lf> | チャンネル XX の 2 番目の較正ポイントを設定します。 |
| WC3XXBaa<cr> | PPSEE<cr><lf> | チャンネル XX に 3 番目のキャリブレーションポイントを設定し、ポイントが存在しない場合はエラーを返します。 |
| WC4XXBaa<cr> | PPSEE<cr><lf> | チャンネル XX に 4 番目のキャリブレーションポイントを設定し、ポイントが存在しない場合はエラーを返します。 |
| R2<cr> | 01 02 03 04 05 … <cr><lf> | MX200に接続されているチャンネル番号を出力 |
| R3XX<cr> | HI<cr> or LO<cr><lf> | 局XXのHI/LO分解能を出力します。 |
| W3XX<cr> | HI<cr> or LO<cr><lf> | ステーションXXのHI/LO解像度を切り替える |
| R4<cr> | 01 02 03 04 05 … <cr><lf> | 測定画面に表示するように設定したチャンネル番号を出力します。 |
| W4XX<cr> | ON<cr> or OF<cr><lf> | 測定画面からチャンネル XX を追加または削除します。 |
| R5XX<cr> | FbaaBAA<cr><lf> | 出力アナログ出力形式、高低値 |
| W5XXF<cr> | F<cr><lf> | チャンネル XX のアナログ出力フォーマットを linear-by-decade (lin/dec=3, lin/dec 7E=4) に設定します。 |
| W5XX1baa<cr> | Fbaa<cr><lf> | チャンネル XX のアナログ出力フォーマットをリニアに設定します。 |
| W5XX2baaBAA<cr> | FbaaBAA<cr><lf> | チャンネル XX のアナログ出力フォーマットをリニアに設定します。 |
| R6XX<cr> | GG<cr><lf> | チャンネルXXの出力ガス設定 |
| W6XXGG<cr> | GG<cr><lf> | チャンネル XX をガスタイプに設定して GG |
| R7Y<cr> | ppseePPSEEZZ<cr><lf> | 出力リレーYオン=ppsee、リレーYオフ=ppsee、リレーYに割り当てられたチャンネルZZ |
| W7YppseePPSEEZZ<cr> | ppseePPSEE<cr><lf> | リレーYをppseeにオン、リレーYをppseにオフ、リレーYをチャンネルZZに設定する。 |
| R8<cr> | A<cr><lf> | 冷陰極モードA(自動=1、自己=2)を出力します。 |
| W8A<cr> | A<cr><lf> | 冷陰極モードA(自動=1、自己=2)を設定します。 |
| R9<cr> | BB<cr><lf> | 冷陰極スイッチポイント値 BB(01~50)を返します。 |
| W9BB<cr> | BB<cr><lf> | 冷陰極スイッチポイント値 BB(01~50)を設定します。 |
| R10<cr> | CD<cr><lf> | 冷陰極の状態を奇数・偶数(オン/オフ) C-odd, D-even(0 = オフ, 1 = オン)で返します。 |
| W10CD<cr> | CD<cr><lf> | 冷陰極の状態を奇数、偶数(オン/オフ)に設定 C-odd,D-even(0=オフ、1=オン) 冷陰極の状態を奇数、偶数(オン/オフ)に設定します。 |
| C1TTTT<cr> | TTTT<cr><lf> | ボーレートをTTTTに設定 |
| C2EE<cr> | EE<cr><lf> | アドレスをEE(00~99)に設定、RS-485のみ |
| C4N<cr> | N<cr><lf> | I/O を N に変更 (RS-232=1, RS-485=2, USB=3) |
| C1<cr> | TTTT<cr><lf> | 出力ボーレート設定 |
| C2<cr> | EE<cr><lf> | RS-485用出力アドレス |
| C4<cr> | N<cr><lf> | 出力通信タイプ(RS-232=1、RS-485=2、USB=3 |
| HM<cr> | M<cr><lf> | 測定画面に戻る |
| RLR<cr> | SXXX<cr> | リーク率計算またはチャンネル1をmTorrで出力(S=sign、XXX=-999~999)。 |
| WLRX<cr> | X<cr><lf> | チャンネル 1 のリーク率計算の ON/OFF(0=OFF、1=ON |
| WD_1XX<cr> | XX<cr><lf> | チャンネルXXのチャンネル設定をデフォルトに戻す |
| WD_7X<cr> | X<cr><lf> | セットポイントリレーのデフォルトをセットポイントXのために復元します。 |
| WD_CXX<cr> | XX<cr><lf> | チャンネル XX の較正をデフォルトに戻す |
| WD_G<cr> | D<cr><lf> | グローバルセットアップのデフォルトを復元する |
| SN<cr> | NNNNNN<cr><lf> | ユニットの6桁のシリアル番号を返します。 |
| PG_LGC<cr> | Bootloader … <cr><lf> | ロジックファームウェアのブートローダを入力します。 |
| PG_DSP<cr> | Bootloader … <cr><lf> | 表示ファームウェアのブートローダを入力します。 |
関連製品
- 1*10-11 Torr~1*104Torr
- 最大10台のTelevac®真空ゲージを制御
- RS-232/RS-485/USBデジタル通信
- 見やすいOLEDディスプレイ


