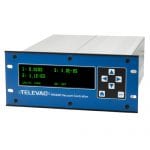
설명
이 애플리케이션 노트에서는 Windows PC에서 MX200과 인터페이스하고 통신하는 프로세스를 설명합니다. 이 지침을 따르기 전에 직렬 통신 프로그램인 Tera Term을 설치해야 합니다. Tera Term이 설치되어 있지 않은 경우 여기를 클릭하여 GitHub에서 최신 버전을 설치하세요.
지침
1. 제품 뒷면의 MX200 USB 포트를 PC의 USB 포트에 연결합니다.
2. 드라이버는 자동으로 다운로드 및 설치됩니다. 그렇지 않은 경우 여기에서 드라이버를 다운로드할 수 있습니다.
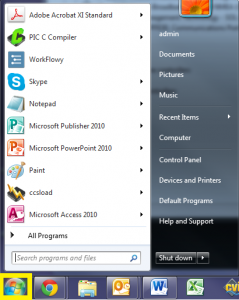
3. 3. 시작 메뉴를 엽니다.
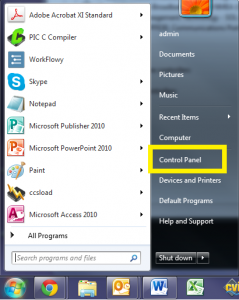
4. 제어판을 엽니다.
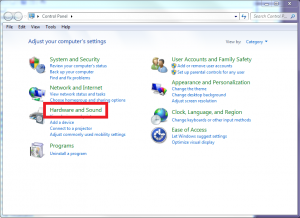
5. 5. 하드웨어 및 사운드를 엽니다.
6. 6. 장치 관리자를 엽니다.
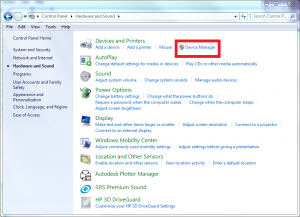
7. 포트(COM 및 LPT) 드롭다운을 펼칩니다.
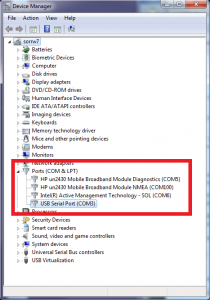
8. MX200에 대한 COM 포트 할당을 결정합니다(이 예에서는 MX200이 COM3에 할당되어 있습니다).
9. 9. TeraTerm을 엽니다.
10. 10. 설정 메뉴를 열고 직렬 포트... 옵션을 선택합니다.
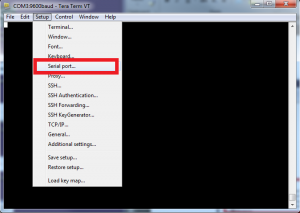
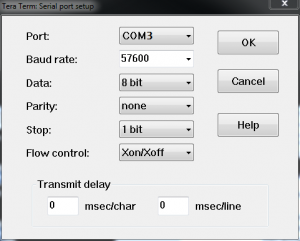
11. 포트 설정을 MX200의 COM 포트(이 예에서는 COM3)로 변경합니다.
12. 나머지 설정이 아래 표시된 내용과 일치하는지 확인한 다음 확인을 선택합니다. 이 예에서는 기본 전송 속도인 57600을 사용합니다. 전면 패널에서 홈 버튼을 누른 다음 글로벌 설정>커뮤니케이션>설정>바드 레이트로 이동하여 변경할 수 있습니다.
- 보드 비율: 57600
- 데이터: 8비트
- 패리티: 없음
- 중지: 1비트
- 흐름 제어: Xon/Xoff
- 전송 지연: 0 msec/char, 0 msec/라인
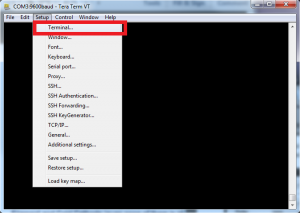
13. 설정 메뉴를 열고 터미널 설정... 옵션을 선택합니다.
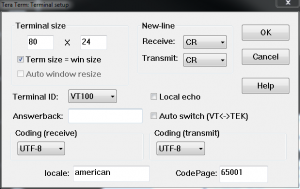
14. 통신 사용 방식에 따라 설정이 다음과 같은지 확인한 다음 확인을 선택합니다:
부트로딩용
- 수신: CR
- 전송: CR
- 로컬 에코: 선택 되지 않은
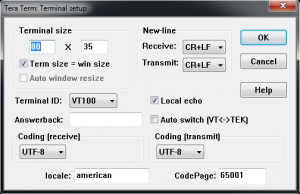
터미널의 표준 통신용
-
- 수신: CR+LF
- 전송: CR+LF
- 로컬 에코: 확인
15. You should now be able to communicate with the MX200. As an example, send the following command to read the output from all connected channels: “S1<cr>” (not including the quotations). A list of all commands can be found below in Table 1. A more detailed description of the communications can be found in the MX200 manual.
| 명령 | 샘플 출력 | 설명 |
| R1<cr> | XX<cr><lf> | 출력 단위 설정 XX: PA=파스칼, TR=토르, MB=mBar, TD=토르 소수점, MT=mTorr/Torr |
| W1XX<cr> | XX<cr><lf> | XX로 단위 설정: PA=파스칼, TR=토르, MB=mBar, TD=토르 소수점 |
| S1XX<cr> | ppsee<cr><lf> | 스테이션 XX용 진공 판독은 ppsee입니다. |
| S1<cr> | XX=ppsee … XX=ppsee<cr><lf> | 모든 채널 XX에 대한 출력 ppsee 판독값 |
| S2<cr> | NNNNNN<cr><lf> | 로직 펌웨어 버전 |
| S3<cr> | NNNNNN<cr><lf> | 펌웨어 버전 표시 |
| S4<cr> | XX=YY … XX=YY<cr><lf> | 출력 스테이션 유형: XX = 스테이션 번호, YY = 센서 유형 |
| S5<cr> | XX=YY … XX=YY<cr><lf> | 출력 세트 점 XX 상태 YY(ON=켜짐, OF=끄기, 00=설정 점 연결 없음) |
| S6<cr> | Televac … <cr><lf> | 모든 설정 정보 출력 |
| RC1XX<cr> | Baa<cr><lf> | 채널 XX의 출력 첫 번째 교정 지점 |
| RC2XX<cr> | Baa<cr><lf> | 채널 XX에 대한 출력 두 번째 교정 지점 |
| RC3XX<cr> | Baa<cr><lf> | 채널 XX에 대한 세 번째 보정 지점 출력, 포인트가 없는 경우 반환 오차 |
| RC4XX<cr> | Baa<cr><lf> | 채널 XX에 대한 네 번째 보정 지점 출력, 포인트가 없는 경우 반환 오차 |
| WC1XXBaa<cr> | PPSEE<cr><lf> | 채널 XX에 대한 첫 번째 교정 지점 설정 |
| WC2XXBaa<cr> | PPSEE<cr><lf> | 채널 XX에 대한 두 번째 교정 지점 설정 |
| WC3XXBaa<cr> | PPSEE<cr><lf> | 채널 XX에 대한 세 번째 교정 지점 설정, 포인트가 없는 경우 반환 오류 |
| WC4XXBaa<cr> | PPSEE<cr><lf> | 채널 XX에 대한 네 번째 교정 지점 설정, 포인트가 없는 경우 반환 오류 |
| R2<cr> | 01 02 03 04 05 … <cr><lf> | MX200에 연결된 출력 채널 번호 |
| R3XX<cr> | HI<cr> or LO<cr><lf> | 스테이션 XX용 HI/LO 해상도 출력 |
| W3XX<cr> | HI<cr> or LO<cr><lf> | 스테이션 XX용 토글 HI/LO 해상도 |
| R4<cr> | 01 02 03 04 05 … <cr><lf> | 측정 화면에 표시하도록 설정된 출력 채널 번호 |
| W4XX<cr> | ON<cr> or OF<cr><lf> | 측정 화면에서 채널 XX를 추가하거나 제거합니다. |
| R5XX<cr> | FbaaBAA<cr><lf> | 출력 아날로그 출력 형식, 높고 낮은 값 |
| W5XXF<cr> | F<cr><lf> | 채널 XX 아날로그 출력 형식을 선형별 으로 설정합니다(lin/dec=3, lin/dec=4) |
| W5XX1baa<cr> | Fbaa<cr><lf> | 채널 XX 아날로그 출력 형식을 선형으로 설정: baa=높은 값 |
| W5XX2baaBAA<cr> | FbaaBAA<cr><lf> | 선형채널 XX 아날로그 출력 형식을 선형으로 설정: baa=높은 값, BAA=낮은 값 |
| R6XX<cr> | GG<cr><lf> | 채널 XX의 출력 가스 설정 |
| W6XXGG<cr> | GG<cr><lf> | 채널 XX를 가스 타입으로 GG로 설정 |
| R7Y<cr> | ppseePPSEEZZ<cr><lf> | 출력 릴레이 Y 온 = ppsee, 릴레이 Y 오프 = PPSEE, 채널 ZZ 릴레이 Y |
| W7YppseePPSEEZZ<cr> | ppseePPSEE<cr><lf> | 릴레이 Y를 PPSEE로 설정하고, Y를 PPSEE로 릴레이하고, Y를 채널 ZZ로 릴레이 |
| R8<cr> | A<cr><lf> | 차가운 음극 모드, A(자동 = 1, 자체 = 2)를 출력합니다. |
| W8A<cr> | A<cr><lf> | 차가운 음극 모드, A(자동 = 1, 자기 = 2) 설정 |
| R9<cr> | BB<cr><lf> | 차가운 음극 스위치 포인트 값, BB (01 ~ 50) 반환 |
| W9BB<cr> | BB<cr><lf> | 차가운 음극 스위치 포인트 값, BB(01 ~ 50) 설정 |
| R10<cr> | CD<cr><lf> | 차가운 음극 상태를 홀수 및 도저히 반환하고 C-odd, D-even (0 = 끄기, 1 = 켜기) |
| W10CD<cr> | CD<cr><lf> | 차가운 음극 상태를 홀수로 설정하고 C-odd, D-even (0 = 끄기, 1 = 켜기) |
| C1TTTT<cr> | TTTT<cr><lf> | TTTT로 baud 속도 설정 |
| C2EE<cr> | EE<cr><lf> | 주소 설정 주소는 EE(00~99), RS-485 전용 |
| C4N<cr> | N<cr><lf> | I/O를 N으로 변경(RS-232=1, RS-485=2, USB=3) |
| C1<cr> | TTTT<cr><lf> | 출력 baud 속도 설정 |
| C2<cr> | EE<cr><lf> | RS-485의 출력 주소 |
| C4<cr> | N<cr><lf> | 출력 통신 유형(RS-232=1, RS-485=2, USB=3) |
| HM<cr> | M<cr><lf> | 측정 화면으로 돌아가기 |
| RLR<cr> | SXXX<cr> | mTorr에서 누출 속도 계산 또는 채널 1을 출력 (S = 기호, XXX =-999 ~ 999) |
| WLRX<cr> | X<cr><lf> | 채널 1의 누출 속도 계산 켜기 또는 끄기(0=끄기, 1=켜기) |
| WD_1XX<cr> | XX<cr><lf> | 채널 XX의 채널 설정 기본값 복원 |
| WD_7X<cr> | X<cr><lf> | 세트점 X에 대한 세트 포인트 릴레이 기본값 복원 |
| WD_CXX<cr> | XX<cr><lf> | 채널 XX의 교정 기본값 복원 |
| WD_G<cr> | D<cr><lf> | 전역 설정에 대한 기본값 복원 |
| SN<cr> | NNNNNN<cr><lf> | 000000에서 999999까지의 값으로 장치의 6자리 일련 번호를 반환합니다. |
| PG_LGC<cr> | Bootloader … <cr><lf> | 로직 펌웨어의 부트 로더 입력 |
| PG_DSP<cr> | Bootloader … <cr><lf> | 디스플레이 펌웨어의 부트 로더 입력 |
관련 제품
- 1*10-11 토르 ~ 1*104 토르
- 최대 10개의 Televac® 진공 게이지 제어
- RS-232/RS-485/USB 디지털 통신
- 읽기 쉬운 OLED 디스플레이


