Purpose
This application note explains how the relay set point of an MP2AR or MP4AR rough vacuum active gauge can be used to automatically enable and disable an MX7B or MX7M cold cathode high vacuum active gauge.
Relevant Televac® Products
This application note applies to the Televac® products listed below:
Background
The Televac® MP2AR and MP4AR are thermal conductivity gauges for rough vacuum measurement (1*10-3 Torr to 20/760 Torr). The Televac MX7B and MX7M are cold cathode gauges for high and ultra high vacuum measurement (1*10-11/1*10-8 Torr to 1*10-2 Torr).
Due to the design of cold cathodes, it is important that they are not turned on at pressures above 1*10-2 Torr. Turning the cold cathode on at higher pressures will lead to sputtering, oxidation, and contamination; these will cause inaccurate readings and damage to the sensor. Therefore, it is necessary to use a rough vacuum gauge, such as the MP2AR or MP4AR, to disable the cold cathode at pressures above 1*10-2 Torr.
The MP2AR and MP4AR both include a relay set point, which is essentially a switch that can be set to a specific vacuum reading. In this case, the set point will be 1*10-2 Torr. The relay can be wired to the cold cathode’s voltage supply, creating an active gauge system capable of measuring from high vacuum (10-11/10-8 Torr) to rough vacuum (20/760 Torr).
Configuring the MP2AR/MP4AR Set Point
The MP2AR and MP4AR have a relay set point that can be used to output a signal when a certain vacuum level is read. This signal can then be used to turn on the cold cathode when it is needed. To control the MX7B/MX7M, we recommend turning them on at 1*10-2 Torr, so the set point should be configured to trip at that vacuum level. Note that these are just recommendations. Your system may require different settings.
The current setting for the setpoint can be viewed by pressing the “setpoint display” button on top of the MP2AR/MP4AR. This will display the setpoint vacuum on the display. Note that the micron LED will light up for pressures below 1 Torr. The display will blink while showing the setpoint value. To return to normal operation, press the “setpoint display” button again, or wait 60 seconds for it to time out.
The setpoint can also be read as a voltage from pin 9 on the DB9 connector. This voltage value can be converted to vacuum using the method described in the MP2AR/MP4AR manual.
To adjust the setpoint on the MP2AR/MP4AR, do the following:
- View the setpoint using either of the methods described above.
- Turn the “setpoint adjustment” screw to change the setpoint value.
- Adjust the setpoint to 10 microns.
Enabling Pin Control on the MX7B/MX7M
The MX7B/MX7M must be put into pin control mode before it can be turned on and off with an MP2AR/MP4AR. To put the gauge into pin control mode, follow these steps:
- Press SEL until the screen says “System Settings”. If initially on the measurement screen, it should be pressed 2 times to reach this screen.
- Press SEL until Vsense Control is shown on the screen. This should be the 4th setting.
- Use the up and down arrows to set this to Pin Control.
This can also be done with the RS-485 W8 command. The following command will set the unit to pin control mode. Note that X is the address of the unit (default 0) and <cr> is a carriage return (which is sent when the enter key is pressed).
*XW81<cr>
For more information on the W8 command, see the MX7B and MX7M manuals. Now, the MX7B/MX7M is ready to be controlled by the MP2AR/MP4AR’s relay.
Connecting the MP2AR/MP4AR to the MX7B/MX7M
The MX7B/MX7M’s pin control toggles based on pins 13 and 14. When they are shorted, the cold cathode turns on. Otherwise, the cold cathode will be off.
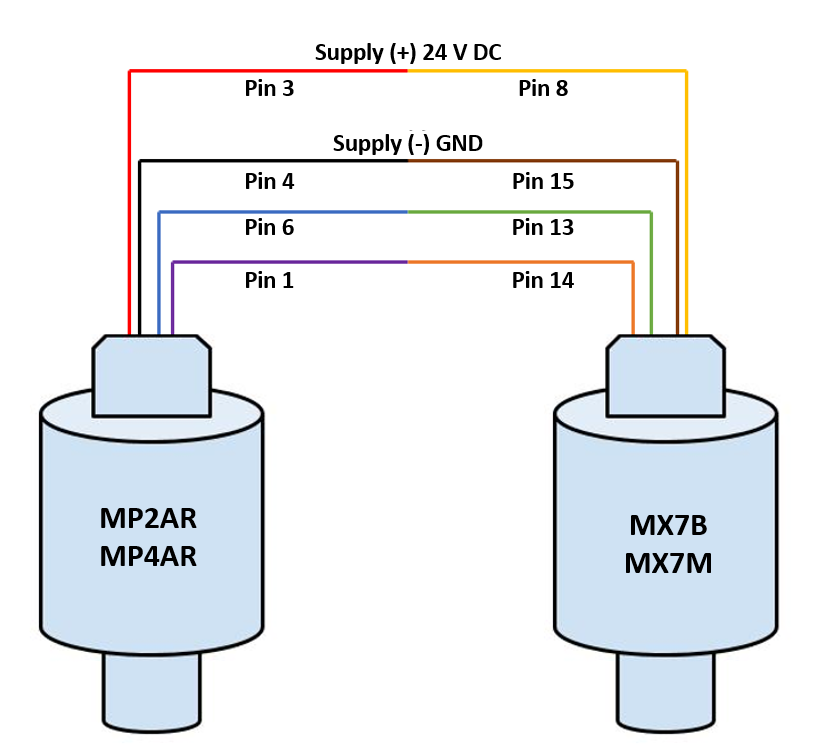
The MP2AR/MP4AR’s relay will connect pins 2 and 6 when the pressure is above the setpoint, and will connect pins 1 and 6 when the pressure is below the setpoint. Therefore, this can be used to short pins 13 and 14 on the MX7B/MX7M. The following table and diagram show the connections that will allow the relay to control the MX7B/MX7M:
| MP2AR/MP4AR | MX7B/MX7M |
| Pin 6 (Relay COM) | Pin 13 |
| Pin 1 (Relay NO) | Pin 14 |

The MX7B/MX7M will now only turn on the cold cathode if the MP2AR/MP4AR detects pressure lower than 1*10-2.
Note that it is necessary to supply power to units. Additionally, it may be necessary to connect to the analog or RS-485 connections depending on the application.
Related Products
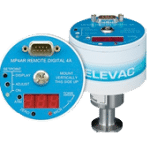
MP2AR Thermocouple Active Vacuum Gauge
• 1*10-3 Torr up to 20 Torr
• Compact and robust design
• Sensors easy to replace
MP4AR Convection Active Vacuum Gauge
• 1*10-3 Torr up to 20 Torr
• Compact and robust design
• Sensors easy to replace
MX7B Cold Cathode Active Vacuum Gauge
• 1*10-8 Torr to 1*10-3 Torr
• Set point relay and open connector for process control
• Compact and contamination resistant
MX7M Cold Cathode Active Vacuum Gauge
• 5*10-11 Torr to 1*10-2 Torr
• Set point relay and open connector for process control
• All metal seals leading to low outgassing


