说明
This application note explains the basics of the process for creating and mapping Class 3 Explicit Message connections in the Rockwell Automation Studio 5000 development environment for CompactLogix Programmable Logic Controllers (PLCs). This will allow the PLC to communicate with the connected EthernetIP Televac® device to exchange data and set parameters from a remote location. Before setting up a new connection, refer to Televac® Application Note 3016 for loading an EDS file into the PLC and adding a new Ethernet module to the project.
Please see the relevant Televac® EthernetIP product Instruction Manual for a full description on Class 1 and Class 3 connections, as well as a complete ADI table including data instance, name, array length, access, and description, and for information on configuring the IP Address.
1. Setting up a Class 3 GET Connection
1.1. Verify that the EDS file has been loaded and an Ethernet module has been successfully added to the project.
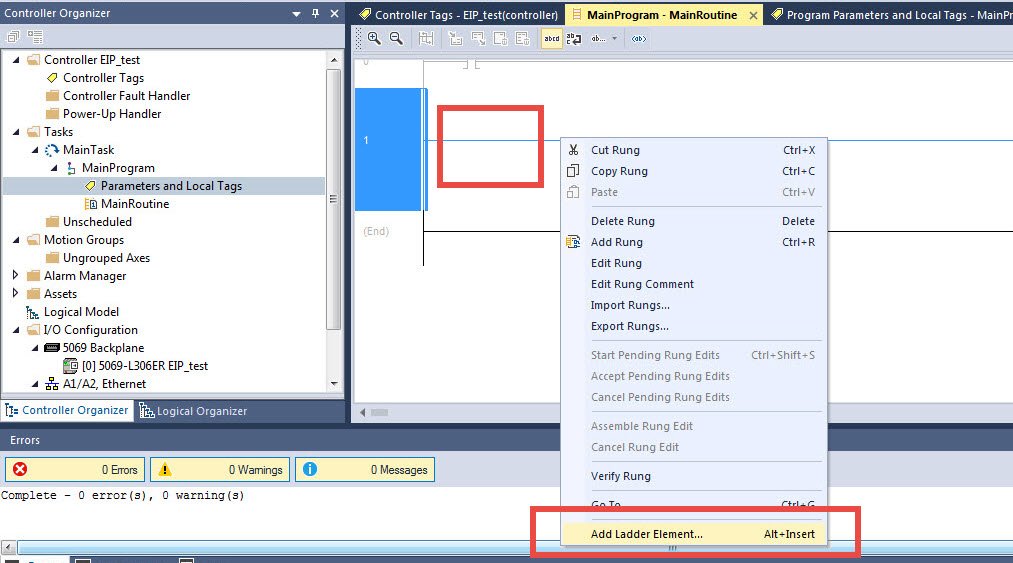
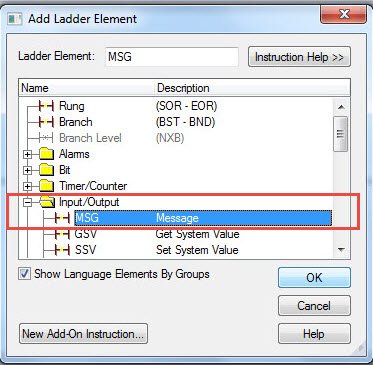
1.2. Select the rung for the message, right click, and select “Add Ladder Element…” from the drop-down menu.
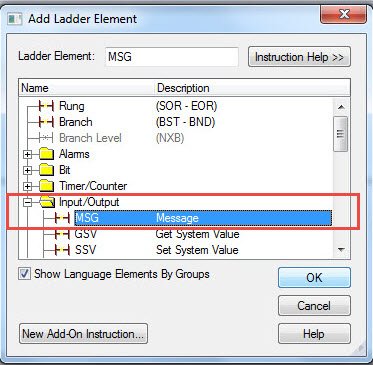
1.3. Locate the “Input/Output” folder and select “MSG” from the list.
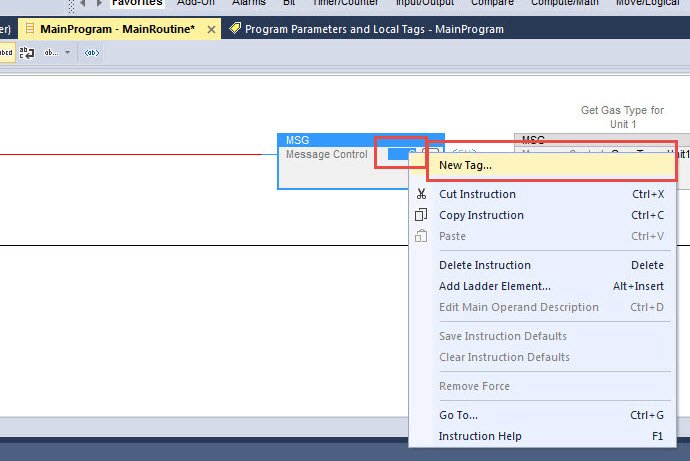
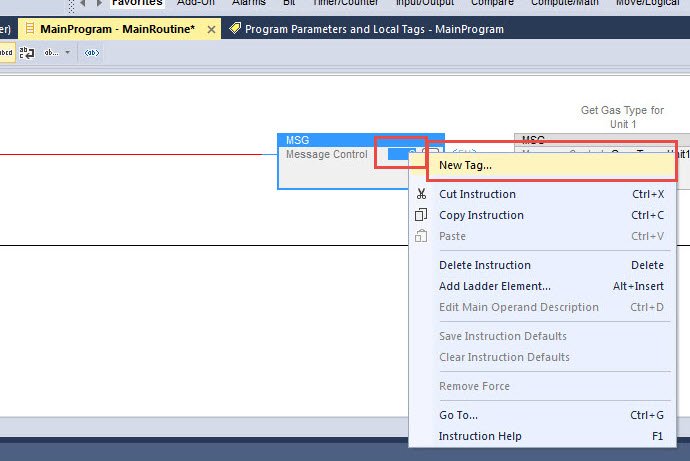
1.4. Right-click on the box within the MSG element and select “New Tag…” from the menu.
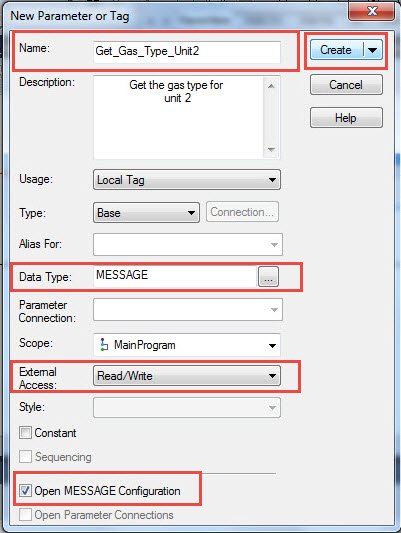
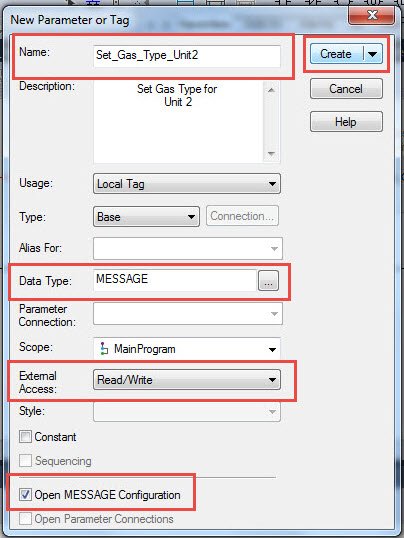
1.5. Provide a name for the tag, select MESSAGE data type, set the external access based on the ADI in the manual, and select Open MESSAGE Configuration. Once complete, select Create.
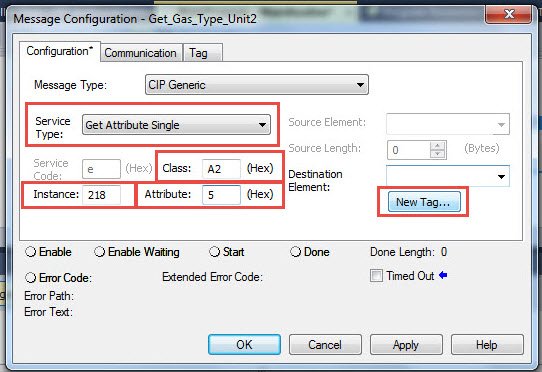
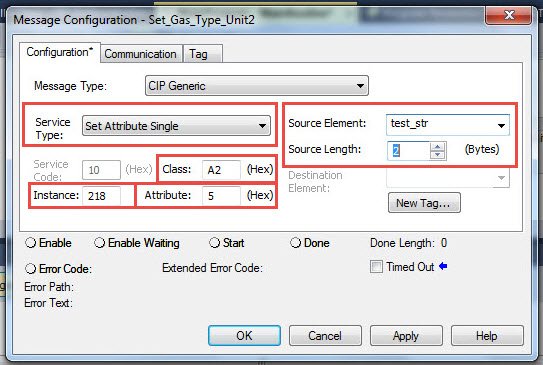
1.6. Select “Get Attribute Single” from the Service Type list. Set Class to “A2” and Attribute to “5”. These values will be the same for all Televac® EthernetIP Class 3 connections. Refer to the appropriate product ADI table located in the User Manual for the Instance. In this example, the Gas Type for Unit 2 for the EthernetIP Gateway is Instance 218. Select “New Tag…” for the Destination Element where the data will be stored locally.
1.7. Create a new local tag that will store the parameter data. Pressure data is transmitted as a REAL and all other data is transmitted as a STRING. Set the External Access based on the GET/SET information from the ADI in the manual. Once complete, select Create.
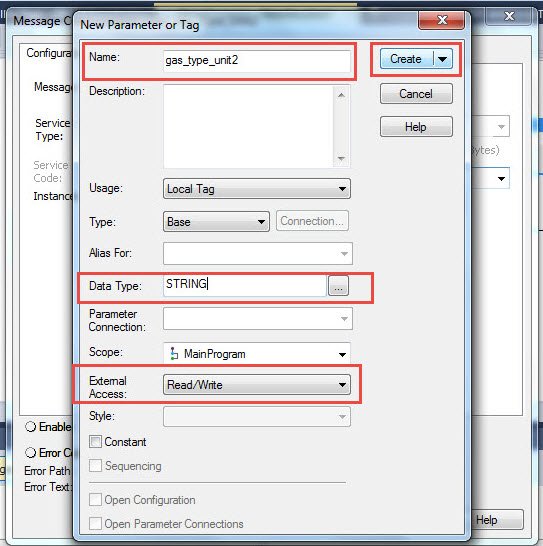
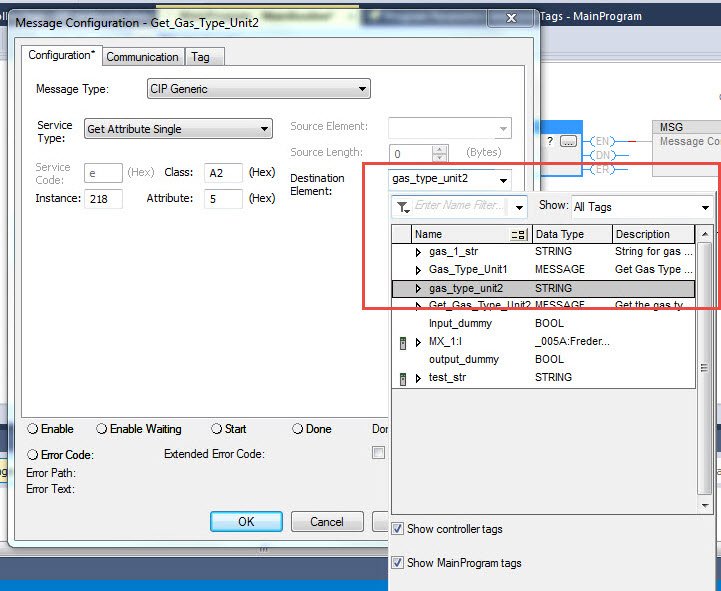
1.8. Select the newly created local tag in the Destination Element box.
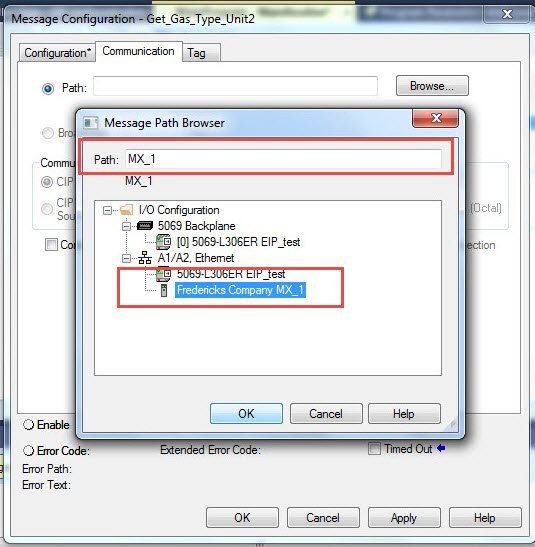
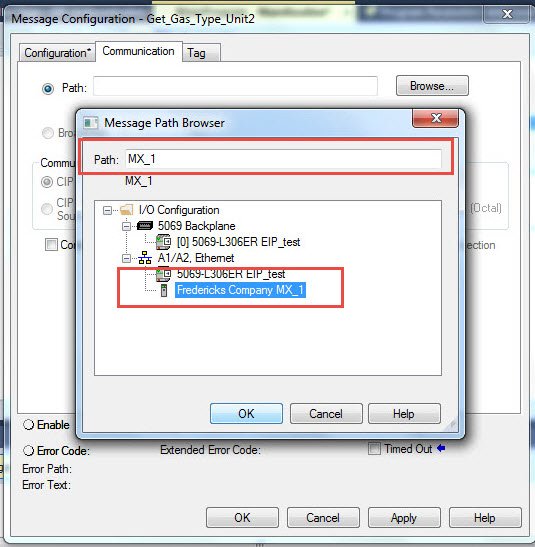
1.9. Move to the Communication tab and select the Televac Ethernet module. Verify that the name of the module shows up in the Path location.
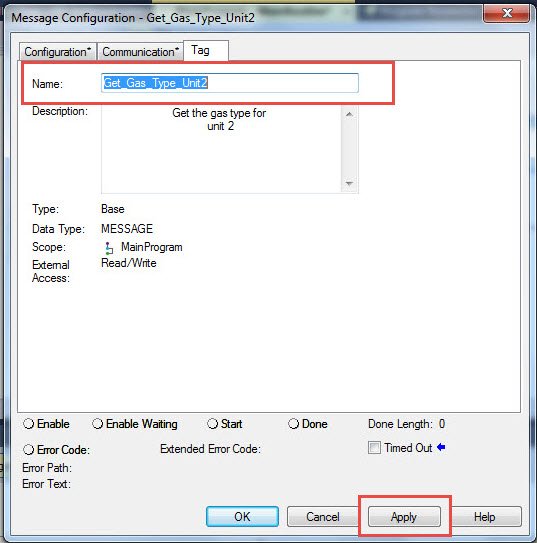
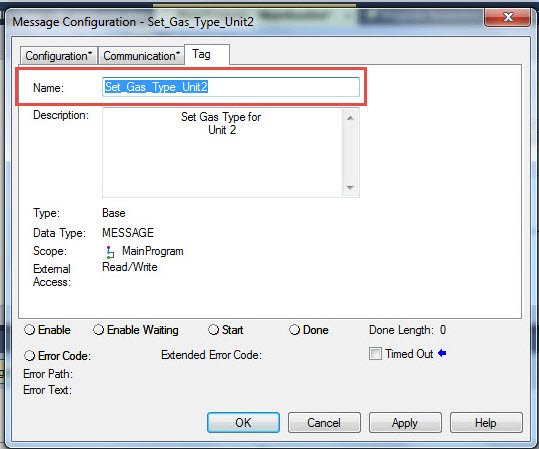
1.10. Move to the Tag tab and verify that the tag Name matches the tag that was created in Step 1.5. When finished, select Apply to save the changes and OK to exit the configurator.
2. Setting up a Class 3 SET Connection
2.1.验证EDS文件是否已加载,以太网模块是否已成功添加到项目中。
2.2. Create a new STRING type tag in the Controller Tags table. Set the String Length to match the Array Size of the instance being set from the product ADI table. In this example, the array size of the Gas Type from the EthernetIP Gateway is 2 bytes.

2.3. Set the String to the desired parameter. In this example, the String is set to “N2” for Nitrogen gas.
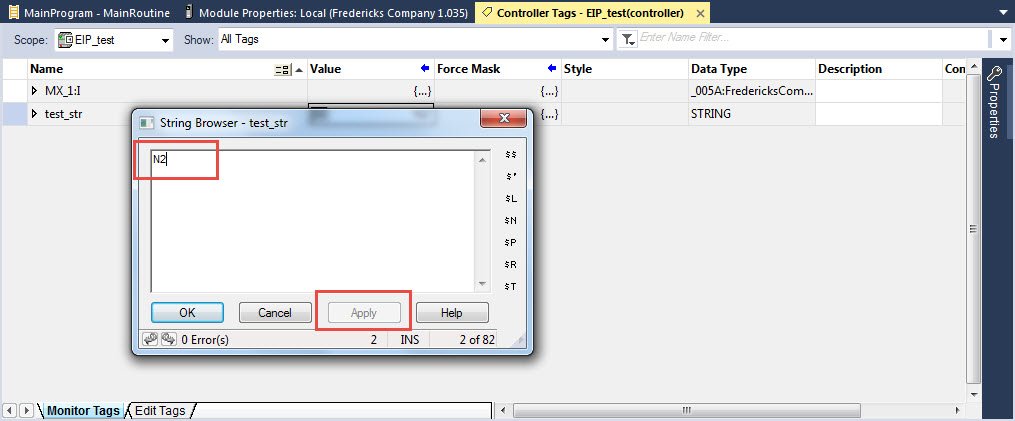
2.4. Select the rung for the message, right click, and select “Add Ladder Element…” from the drop-down menu.
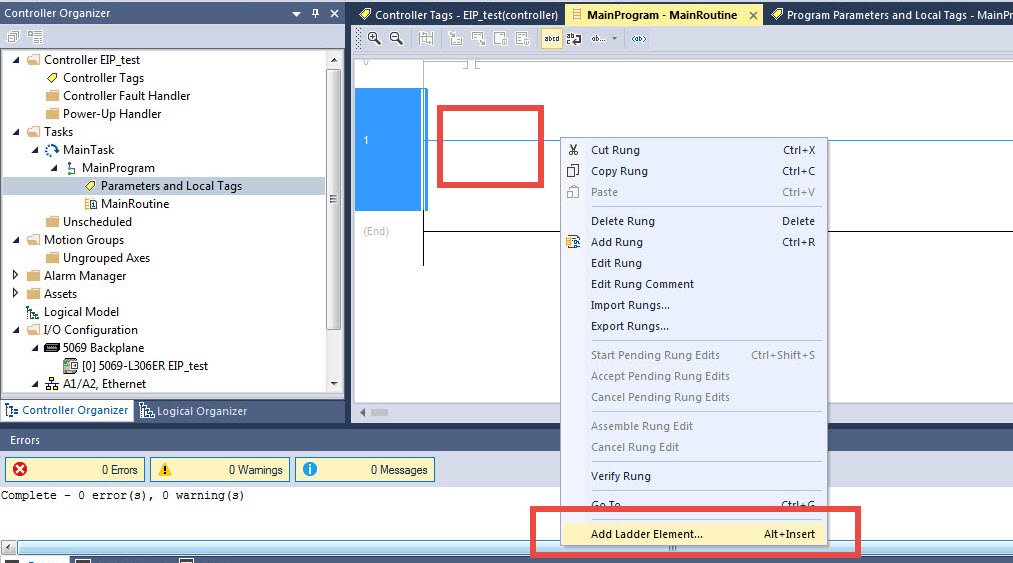
2.5. Locate the “Input/Output” folder and select “MSG” from the list.
2.6. Right-click on the box within the MSG element and select “New Tag…” from the menu.
2.7. Provide a name for the tag, select MESSAGE data type, set the external access based on the ADI in the manual, and select Open MESSAGE Configuration. Once complete, select Create.
2.8. Select “Set Attribute Single” from the Service Type list. Set Class to “A2” and Attribute to “5”. These values will be the same for all Televac® EthernetIP Class 3 connections. Refer to the appropriate product ADI table located in the User Manual for the Instance. In this example, the Gas Type for Unit 2 for the EthernetIP Gateway is Instance 218. Set the Source Element and Length to the tag created in step 2.2 that is used for storing the value to send to the module.
2.9.移动到"通信"选项卡,选择Televac以太网模块。确认该模块的名称显示在路径位置。
2.10. Move to the Tag tab and verify that the tag Name matches the tag that was created in Step 2.7. When finished, select Apply to save the changes and OK to exit the configurator.
2.11. The SET MSG ladder element should now be ready to send data to the Ethernet module.


